


Hacksaw Blades with Handles: When the Frame and Blade Must Match
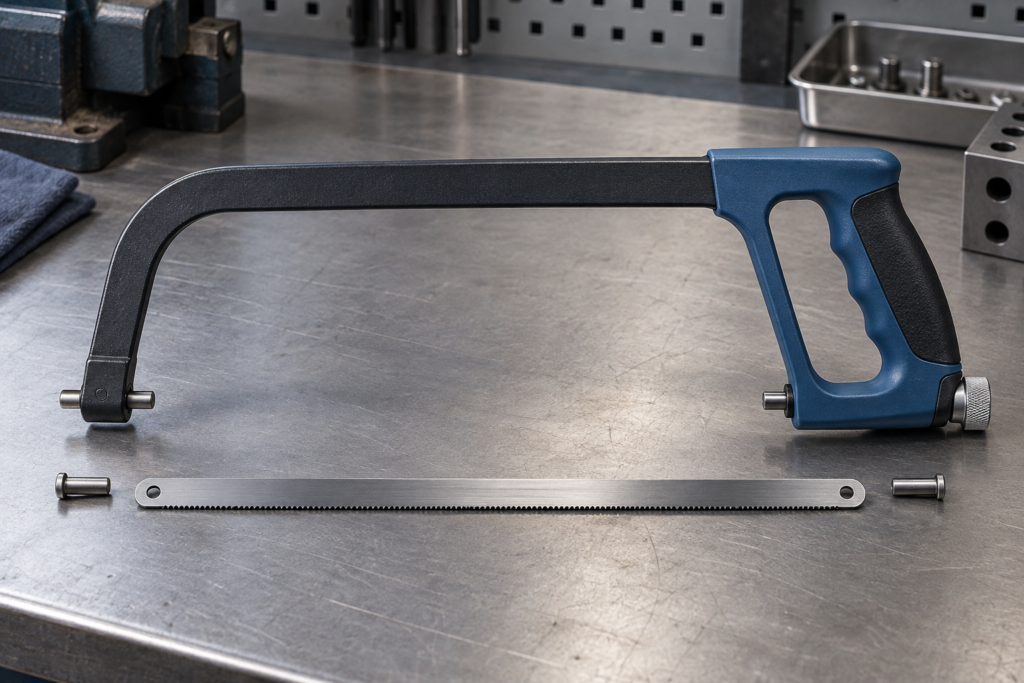
“Hacksaw blade with handle” usually points to a complete hand hacksaw, not a blade with a permanent grip. In a common frame saw, the handle, frame, mounting points, and tensioner form the reusable tool; the blade is a replaceable part. Some junior, pad-saw, or specialist formats package those parts differently, so the product description still needs to state what is included.
Before ordering, decide whether you need a complete tool or only a replacement blade. Then match the tool format, mounting interface, installed blade length, width and thickness where specified, tensioning method, and work clearance. Handle comfort matters, but it does not prove blade compatibility.
What a hacksaw blade with handle may include
| Product description | Likely contents | What must be confirmed |
|---|---|---|
| Complete hacksaw or hacksaw frame | Handle, frame, mounts, tensioner, and often one starter blade | Supplied blade, replacement size, adjustment method, and capacity |
| Replacement hacksaw blade | Blade only | Tool format, length, end detail, width, thickness, TPI, and material |
| Junior hacksaw | Compact frame/handle and a shorter blade | Junior-blade size and mounting system |
| Pad or specialist saw | Handle or holder with a blade projecting from one end | Proprietary clamp, supported blade type, and intended application |
Do not infer package contents from the hero image alone. A photo may show an assembled saw while the listing covers only a blade, or show a blade beside a frame for scale. Read the included-items field, model number, and replacement-blade specification.
How the handle, frame, holder, and blade work together
The handle gives the operator a grip and may also contain or actuate the tensioning mechanism. The frame sets the working envelope and supports the blade mounts. The pins, studs, slots, or clamps locate the blade ends. The tensioner removes slack after the blade is fully seated.
A public hacksaw holder design illustrates the separation clearly: the holder provides clamping and location surfaces, while the frame includes the means to hold the blade under tension. Current commercial models use different implementations. One Hoffmann frame integrates its tensioning nut into the handle and specifies tool-free blade change. A FACOM complete frame uses a lever pre-tension feature and is supplied with a 300 mm bi-metal blade.
These examples show possible designs, not universal requirements. Their published tension, angles, capacity, and supplied blade data belong only to those named models. For another saw, follow its own manual.
Compatibility checks for a replacement blade
- Identify the format. Record full-size hand, junior, pad, powered, or specialist saw.
- Confirm the length definition. Use the manufacturer’s nominal length and inspect the mounting-hole or end relationship.
- Check the blade cross-section. Width and thickness can matter for clamps, guides, clearance, and frame geometry.
- Inspect the mounts. Pins and clamps must be complete, aligned, and able to seat the blade without prying.
- Verify tension travel. The adjuster should install the blade from a released position and tension it within its normal range.
- Select the cutting specification. Match TPI, construction, and application to the workpiece only after mechanical fit is confirmed.
If the blade reaches one mount but not the other, do not use the handle or tension lever as a forcing tool. If the adjuster reaches its limit while the blade remains loose, recheck the installed length and frame condition. If the blade is visibly twisted after both ends seat, inspect the mounting orientation and bent components before cutting.
Evaluate the complete frame, not just the grip
For a complete hacksaw, grip shape is only one selection field. Also compare how the blade is released, whether tension can be repeated without tools, the available throat depth, clearance around the work, alternate blade positions if documented, and access to replacement parts. A padded or closed grip may improve handling for a user, but that is an ergonomic preference rather than a compatibility standard. Record the chosen frame model so replacement buyers do not identify it only by handle color.
Check whether the frame stores spare blades and whether those stored blades are protected from damage. Inspect how easily the mount can be cleaned. In a shared workshop, a visible model record and a defined replacement-blade specification are more valuable than relying on memory or handle color.
Create an order-ready specification
For a complete tool, record the frame model, grip style, tensioning method, nominal blade size, supplied blade construction and TPI, throat or clearance requirement, alternate blade positions, and package contents. For blades only, record the frame model, tool format, length and mounting details, width, thickness, TPI, construction, and workpiece.
The EACHLEAD hacksaw blade category is a route for comparing current blade listings. Record length, width, and thickness separately; those fields do not replace the frame maker’s interface specification. The category should not be read as proof that a frame or handle is included. Distinguish blade families first, then keep the frame and replacement-blade records together.
A complete saw can be convenient because the handle, frame, tensioner, and starter blade arrive as one defined model. Replacement compatibility still depends on the published interface. Ask “what is included?” first, then verify the blade and frame as a system.